News
Waterproof Flooring Laminate: What the Label Really Covers

Waterproof laminate is laminate built to resist surface spills and some moisture through its core, edges and joints. It isn't automatically suitable for wet rooms or standing water. Popular advice tells shoppers to look for the word waterproof and stop there. That shortcut skips the question that decides performance, namely which exposure the product documentation approves for the specific room.
Table of Contents
- What Waterproof Laminate Actually Resists
- How Waterproof Laminate Is Built
- Which Rooms Suit Waterproof Laminate
- Check Concrete Moisture Before You Lay Anything
- How to Install Waterproof Laminate Without Letting Water In
- Common Misconceptions and Early Warning Signs
- Confirm the Waterproof Rating Before You Order
What Waterproof Laminate Actually Resists
Waterproof flooring laminate earns its label from a system working together. A moisture-resistant core slows water uptake if moisture reaches the board interior. Treated edges reduce entry at cut and milled surfaces, while tighter locking joints leave less open path between planks.
Waterproof laminate is laminate with a moisture-resistant core, sealed or treated edges, and tighter locking joints, approved only for the exposures named in its product documentation.
Those features don't turn the room itself into a sealed basin. EN 13329:2016 defined laminate floor coverings and their use classification, but excluded areas exposed to frequent wetting, including bathrooms, laundry rooms, and saunas, unless the manufacturer specifically authorized those applications and supplied installation conditions. That baseline matters because ordinary laminate was not designed around continuous wet exposure.
Match the Exposure to the Claim
| Moisture exposure | What the floor typically handles | What still needs control |
|---|---|---|
| Brief surface spill | Wiped up promptly, surface and joints resist | Clean spills quickly and keep cleaning products matched to the product |
| Standing water from an appliance or sink | Product approval and joint quality determine suitability | Check approval for the room and seal the perimeter |
| Leak or flood | Not a design condition for standard use | Stop the source, dry the floor and check the subfloor |
| Moisture vapor rising from concrete | Not handled by the surface | Test the slab and install the specified vapor control |
| Frequent wetting such as showers | Often excluded in manufacturer documents | Choose a product approved for the room or choose another floor |
A brief spill on top differs from water sitting over a seam, and both differ from vapor pushing up from below. Duration matters because water works toward joints, damaged edges, perimeter gaps, and plumbing openings. A homeowner cannot tell from the decorative face whether those paths will stay closed.
The single question before buying is direct. Does the product documentation approve the exposure this room will see, under its stated installation conditions?
Moisture performance and emissions performance are also separate questions. The EPA guidance on laminate flooring and formaldehyde states that formaldehyde release can increase with heat and may also depend on humidity, while ventilation and humidity control can reduce concentrations. It also notes that product-emission test results can't directly predict indoor concentrations without additional calculations. A waterproof claim therefore says nothing by itself about bedroom air or radiant floor heating.
How Waterproof Laminate Is Built
The waterproof label describes a board and its joint system, not the whole room. A resistant surface and treated edges can slow water entry, but an exposed opening or poorly assembled seam can still let moisture reach the core.
Layers From Top to Bottom
The wear layer protects against abrasion and staining. Beneath it, the decor layer carries the wood or stone image. The core provides thickness and impact strength, and its response to water depends on its material. A backing layer helps balance the board and limit movement from below. At the edges, the locking system joins boards and forms the seams water can test.

Standard high-density fiberboard (HDF) can swell as its wood fibers absorb water. Swelling may raise seam edges and distort the locking profile, creating a path for more water. Moisture-resistant HDF slows that process through resin and edge treatments. A stone plastic composite (SPC) core uses a mineral and polymer mixture that does not swell like wood fiber, though its joints and perimeter still depend on proper assembly.
| Construction feature | Standard laminate | Waterproof laminate |
|---|---|---|
| Core material | Wood fiber (HDF), which can swell when wet | Moisture-resistant HDF or SPC core |
| Edge treatment | Standard edges, exposed to water at seams | Treated edges designed to slow water entry |
| Locking joints | Standard click or tongue-and-groove joints | Tighter locking joints designed to limit water entry |
| Approved water exposure | Spills wiped promptly; no standing water | Exposure approved in the product documentation |
| Typical use rooms | Living areas and bedrooms | Kitchens, entries and some laundry rooms if approved |
The construction is only part of the protection. Locked joints, a sealed perimeter, and carefully finished transitions help keep water from reaching the layers beneath the surface. On a product page, check the approved water exposure, core material, edge treatment, and installation requirements for the specific board.
Which Rooms Suit Waterproof Laminate
Room suitability starts with exposure, then with the product approval for that exposure. Suitable means the documentation approves the use without special wet-area work beyond normal installation. Conditional means the room needs added checks or detailing first, and excluded means manufacturer documents rule the location out.
| Room | Typical moisture exposure | Suitability guidance |
|---|---|---|
| Living room or bedroom | Low, occasional spills | Suitable; waterproof construction adds little need |
| Entryway or mudroom | Tracked-in water and grit | Suitable; waterproof construction helps |
| Kitchen | Splashes, dishwasher or sink leaks | Suitable if the product approves kitchen use; seal the perimeter |
| Laundry room | Washer overflow, possible standing water | Conditional; check approval and floor drain location |
| Basement | Vapor from concrete slab, occasional flooding | Conditional; test the slab first |
| Bathroom | Frequent wetting, shower overflow | Often excluded; check the manufacturer's documentation |
| Pool area, sauna or room with built-in drain | Persistent or intense moisture | Excluded in Pergo installation documents |
Pergo installation documentation specifically excludes damp spaces such as pool areas, saunas, and rooms with built-in drains such as showers, even though its guidance describes protection at the surface and joints. Persistent or unusually intense moisture remains outside that approval, and proper edge treatment is still required where use is allowed.
Three Bathroom Checks and One Laundry Case
A bathroom decision turns on how the room is used. The homeowner checks whether shower spray or overflow reaches the floor regularly, whether a floor drain is present, and whether the product's installation documents name bathroom use. A powder room with only sink splashes presents a different case from a full bath used daily by children.
Say a laundry room holds a washer and has a floor drain nearby. The homeowner confirms the product approves laundry use, plans the specified perimeter seal, checks the slab, and reviews where drain water would travel. Only after those checks does ordering make sense. Material such as the Bedrosians Shorewood luxury vinyl plank belongs in a separate comparison if laminate approval fails, since a different material class follows different documents.
Before ordering, the homeowner maps each appliance, notes likely leak points, and estimates how long escaped water could sit unnoticed. A dishwasher leak discovered within minutes differs from a washer hose leak in an empty house.
Decide the room category first, then choose a product approved for that category.
Check Concrete Moisture Before You Lay Anything
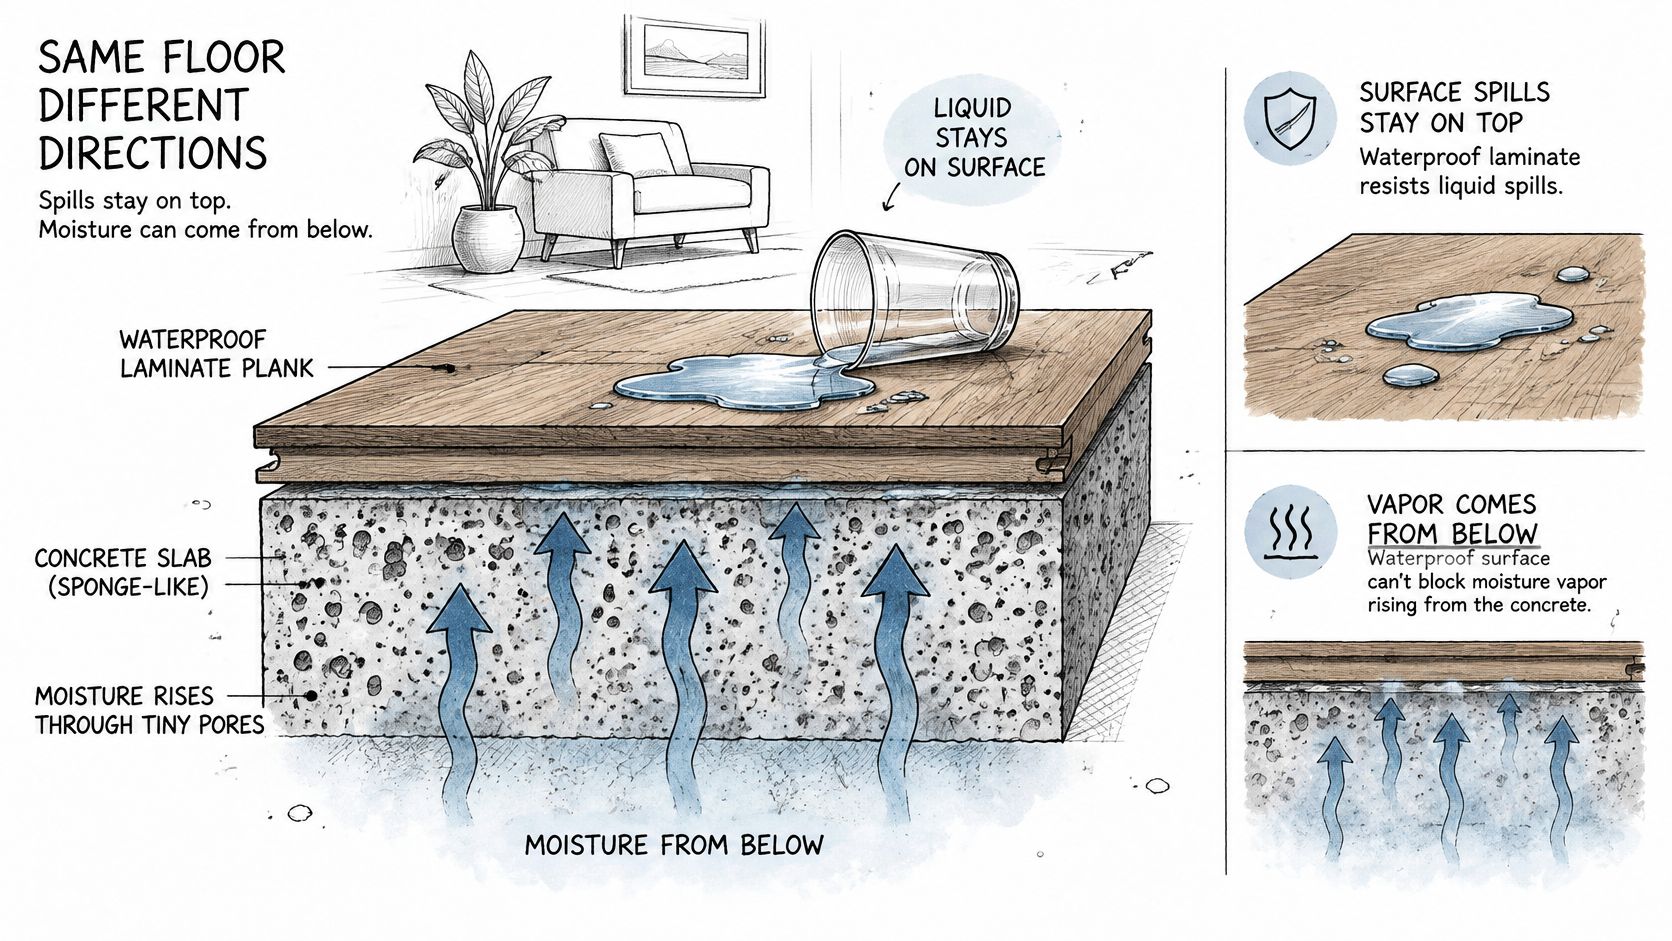
A concrete slab works like a sponge that breathes moisture upward. A plank face that resists a mop bucket spill can't stop vapor arriving from below, day after day. That vapor reaches backing, underlayment, and board edges, where it can produce cupping and edge swelling even when the surface stays dry.
The diagram below separates downward spill risk from upward vapor risk so the two checks don't get confused.
Two Test Methods and Job Site Conditions
Published installation guidance commonly specifies a calcium chloride emission limit of no more than 5 lb per 1,000 sq ft per 24 hours under ASTM F1869, or an in-situ concrete relative humidity result below 80% under ASTM F2170. The same guidance calls for a vapor barrier over concrete with seams overlapped by at least 8 inches.
| Requirement | Reference | Commonly specified limit |
|---|---|---|
| Calcium chloride emission | ASTM F1869 | no more than 5 lb per 1,000 sq ft per 24 hours |
| In-situ concrete relative humidity | ASTM F2170 | below 80 percent |
| Vapor barrier seam overlap | Published installation guidance | at least 8 inches |
| Job site climate | Published installation guidance | about 60 to 85°F and 35 to 65 percent relative humidity |
The sequence stays practical. The contractor tests every slab, corrects excessive moisture before delivery or installation, installs the specified vapor-control layer, and preserves expansion gaps and sealed transitions. Unopened cartons acclimate under controlled conditions of about 60 to 85°F and 35 to 65 percent relative humidity, as cited in that guidance.
The video below shows the slab context that a surface-only claim can't address.
Product-specific instructions take precedence over these common figures. Allowable moisture limits and sealing requirements can vary by construction, so the installer records the test method and result for the exact floor ordered.
How to Install Waterproof Laminate Without Letting Water In
Installation decides whether the board system becomes a room-level moisture barrier or a row of resistant planks separated by open paths. Each step below protects a specific route water uses.

- Stage cartons correctly. Boxes stay flat, dry, and indoors, and the laminate acclimates in the room as the installer and product instructions specify. Boards need to reach room conditions before they're locked into a floating field.
- Confirm the subfloor is ready. The slab test result, vapor-control layer, flatness, and cleanliness all need checking before the first row goes down. Covering a damp slab hides the problem without stopping vapor.
- Leave the perimeter gap. Pergo general installation instructions require a minimum expansion gap of 8 to 10 mm, approximately 5/16 to 3/8 inch, along walls and around pipes, thresholds, and heavy fixed objects such as kitchen islands. The floating floor needs that clearance to move with temperature and humidity.
- Add relief on large floors. The same instructions identify 13 m by 13 m, about 42.7 ft by 42.7 ft, as the maximum before an intermediate expansion gap is required when both length and width exceed that limit. A large tied-together field can't move freely if doorways and long runs lock it in place.
- Lock each row fully. The installer engages each click joint, keeps rows tight, and inspects the seam before moving on. A partially locked joint gives surface water a direct route to the edge and core.
- Seal the perimeter gap. Pergo installation guidance on sealing the floor states the floor must be sealed at the edges in rooms exposed to dampness or spills because the expansion gap can allow moisture to penetrate. Its prescribed method uses compressible PE foam in the gap followed by a permanent silicone sealant, so the seal blocks water while preserving movement.
- Detail every opening. Transitions, pipe penetrations, toilet areas, and door thresholds receive the sealing method the specific product specifies. One unsealed pipe cut can bypass otherwise careful perimeter work.
- Clean with the stated method. Spills get wiped promptly, and routine cleaning follows the product directions. Excess mop water repeatedly driven into seams tests the joint system without any benefit.
A rigid click product such as the Daltile Adventuro rigid click flooring follows its own documents, which reinforces the general rule. The plank surface alone doesn't protect the room. Perimeter detailing, transitions, and plumbing openings form part of the moisture plan, and the exact sealant method stays product-specific.
Common Misconceptions and Early Warning Signs
The word “waterproof” describes a board and its joint system, not the room around it. A floor may resist a particular test exposure while remaining vulnerable to water that reaches its edges, damaged joints, or openings.
Waterproof means suitable for any wet room. The EN 13329 laminate standard addresses performance testing, including water-related properties, but excludes areas subject to frequent wetting, such as bathrooms, laundry rooms, and saunas. A manufacturer may allow a particular product in those rooms under specified installation conditions, so check the product's instructions rather than relying on the label alone.
A sealed surface means sealed edges. Separate tests measure thickness swelling after partial immersion and moisture resistance at assembled joints. That distinction matters: the surface layer is only one part of the floor. Water that reaches seams or exposed edges can swell a wood-fiber core and affect how the locking joints fit.
A lab result predicts every real-room exposure. Standard tests measure performance under defined conditions. They cannot represent every leak, damaged edge, or route water might take through an installed floor. The test describes the product's response to its test conditions; the room's exposure and installation determine what happens on site.
Waterproof floors need no follow-up checks. A slow leak can keep wetting one area even when the surface looks intact. Check for changes around joints, plumbing, and the perimeter, and investigate new staining or odors.
Early Warning Signs a Homeowner Can See
- Swollen or raised seams: Dry the surface, look for a nearby leak, and keep the area out of use until the water source is found.
- Joints opening or planks lifting: Check for moisture below the floor and for restricted expansion clearance at the walls.
- Cupping across boards: Check for slab vapor, underlayment problems, or a recent leak from above.
- Musty smell or perimeter staining: Inspect baseboards, transitions, and the subfloor edge for trapped moisture.
- Moisture under planks: Follow the installer's directions for lifting material, drying the assembly, and correcting the source before relaying it.
There is no universal exposure time that predicts when a particular floor will be damaged. Finding the source early and drying the affected area limits continued exposure.
Confirm the Waterproof Rating Before You Order
A short pre-order sequence prevents the most expensive mismatch, which is a sound product placed in a room it was never approved to serve.
- Classify the room. The homeowner finds the room in the suitability table and notes whether it's suitable, conditional, or excluded.
- Verify the exact product. The product page and installation documents need to agree on the water-resistance claim and approved room use. A laminate example is the Bedrosians Solana laminate floor, whose page is the place to confirm its stated coverage and use details.
- Close the subfloor question. Slab test results and the specified vapor-control layer get confirmed before material ships.
- Calculate by the box. The box calculator estimates boxes for the measured area, with allowance for waste and transitions. Coverage per box is typical only as a planning figure, so the product page must be checked for exact coverage.
- Keep shade consistent. Nexora Flooring sells flooring online by the box and ships across the U.S. Ordering all boxes from one batch keeps shade matched, and a spare box supports future repairs.
- Ask before guessing. A free estimate request through the estimate form fits rooms where slab condition or exposure remains unclear.
The order of decisions stays fixed. Check the room, then the product page, then calculate the boxes.
Homeowners ready to compare approved products can review laminate sold by the box, calculate the quantity for a specific room, and request a free estimate when exposure or slab conditions need a second check. Visit Nexora Flooring to start with the room requirements and order material that matches them.
Published via the Outrank tool