News
Hexagon Tile Bathroom Floor: Sizes, Safety and Boxes

A hexagon tile earns its place on a bathroom floor only when the exact product passes the wet test, the size fits the room, and the order carries enough extra to cover the cuts. For a level interior floor walked on while wet, the ANSI A326.3 standard sets the benchmark at a wet dynamic coefficient of friction of 0.42. Ordering practice adds a waste allowance that runs from about 10 percent for a straight lay in a plain room up to 20 percent where drains, corners and doorways force constant cutting, and a hexagon pattern sits at the demanding end of that range.
Grout lines are the most overrated safety feature in tile. A dense field of small hexagons can still be slick underfoot if the glaze is polished, and a matte 6-inch hexagon with a fraction of the joint area can beat it on a wet test. The geometry doesn't grip; the surface does. What hexagons reliably add is cutting work. Every wall, vanity leg, door jamb and drain collar interrupts a pattern that wants to repeat cleanly, so a floor that takes a few long rip cuts in a plank tile takes dozens of small angled cuts here.
That trade is worth making when the size is chosen from the room rather than from a photograph. The sequence that holds up on a real job runs from size band, to traction figure, to substrate, to layout, to box count, and each step closes off mistakes the next one can't fix.
Table of Contents
- Hexagon Sizes and Formats That Suit a Bathroom Floor
- Slip Ratings to Check Before You Buy Hexagon Tile
- Subfloor, Drainage and Prep Before Setting Hexagons
- Grout Joints and Layout Patterns for Hexagons
- Count Boxes for a Hexagon Bathroom Floor
- Caring for Hexagon Bathroom Floors
- Order Your Hexagon Tile Boxes With Confidence
Hexagon Sizes and Formats That Suit a Bathroom Floor
Two hexagons listed at the same size can cover a floor very differently. A tile quoted corner to corner measures across the points, while one quoted flat to flat measures between parallel sides, and a 2 inch hexagon measured across the points sits visibly smaller than a 2 inch measured between flats. Check which convention the product page uses before comparing two options, because a mismatched comparison shifts the visual scale of the room more than grout color ever will.
Once the measurement convention is settled, the shape works on a bathroom floor in every band from a 1-inch mosaic to 8 inches and beyond. The right band comes down to floor area, how much joint the owner wants to look at, and how many angled cuts the walls, door jambs and drain collar will force. Cutting work scales with the pattern more than with the room size: a small bathroom in large hexagons can still out-cut a bigger room laid in squares, because every edge interrupts a six-sided repeat.
History sits at both ends of the range. The National Park Service preservation guidance records that small, white, unglazed hexagonal mosaics were promoted for bathroom floors in the United States in the late 19th and early 20th centuries, and it defines ceramic mosaic tiles as generally no larger than 2.25 inches and no thicker than 0.25 inch, with common sizes from 0.5 inch to 2.1875 inches; the format stayed in common use through the 1930s. Larger units are much older than the mosaic era. The Metropolitan Museum of Art catalogs a hexagonal ceramic tile attributed to Egypt or Syria and dates it to the 15th to 16th century, and museum collections hold early hexagonal tiles several times wider than any mosaic chip.
| Size band | Typical width | Best fit | Grout and cutting effect |
|---|---|---|---|
| Mini hexagon mosaic | about 1 inch across | Powder rooms and tight floors | Most joints; many small cuts at walls |
| Classic hexagon mosaic | about 2 inches across | Most full bathrooms and the vintage look | Many joints; plan balanced edge cuts |
| Medium hexagon | about 4 to 6 inches across | Larger bathrooms wanting a calmer pattern | Fewer joints; flatter substrate needed |
| Large hexagon | 8 inches or more across | Bold feature floors in bigger rooms | Fewest joints; strict flatness and slippage control |
The medium band is where most full bathrooms land comfortably. A 4 to 6 inch hexagon reads as a pattern from the doorway without turning the floor into texture, and it leaves enough tile between joints that cleaning stays ordinary. The mini and classic mosaic bands carry the historical look and the most grout to scrub. Whatever band wins, the wet traction figure belongs to the exact product and finish, so the size decision and the safety decision stay separate on the order sheet.
Layout test: I tell homeowners to dry-lay a full course across the narrowest wall before committing. If the row ends in slivers at both corners, shift the center line half a tile.
Ready-made formats save a search. The hexagon tile collection groups the mosaic and mid-size bands in one place, and the Daltile Keystones collection covers the classic mosaic look. For the large end of the table, listings run well past 8 inches: Emser's Center line includes a hexagon at 13 by 35 inches, priced at $22.02 per sq ft, sold per box and per square foot.
Slip Ratings to Check Before You Buy Hexagon Tile
The tested wet DCOF value for the exact tile and finish belongs in the order file next to the square footage. A "slip resistant" line printed on the carton leaves the question unanswered.
ANSI A137.1 measures wet dynamic coefficient of friction with the DCOF AcuTest, and the Tile Council of North America DCOF guidance spells out the method and the benchmark in one place: the reading is taken across a lightly soapy solution containing 0.05 percent sodium lauryl sulfate, level interior floors expected to be walked on while wet should carry a wet DCOF of at least 0.42, and across 300 tile surfaces a wet static COF of 0.60 correlated on average with only 0.38 wet DCOF. An older static-friction result cannot stand in for the dynamic number.
Small hexagons carry a reputation for grip because the pattern packs more joints underfoot. Joints do give water somewhere to go and give a sole more edges to catch, but they are not a rating. Two mosaic sheets with identical joint spacing can test very differently once the glaze changes, so the documented value still decides the floor.
ANSI A326.3 applies the same dynamic test, and Natural Stone Institute course material lands on the same benchmark for level interior areas walked on wet. When two trade documents agree on one figure, the request to a supplier becomes simple.
| Rating or test | What it measures | Benchmark or figure | How to use it on a bathroom floor |
|---|---|---|---|
| Wet DCOF (ANSI A137.1, AcuTest) | Traction on a wet, soapy surface | At least 0.42 for level interior floors walked on wet (Natural Stone Institute course material) | Request the tested value for the exact tile |
| Wet static COF (older method) | A different test, not interchangeable with DCOF | 0.60 wet static COF correlated with only 0.38 wet DCOF across 300 surfaces (TCNA) | Do not substitute it for the DCOF value |
| Water absorption (ASTM C373) | How much water the tile body takes in | 0.5 percent or less defines porcelain (TCNA tile initiative) | Suits wet-prone floors when paired with proper waterproofing |
| Polished or glossy finish | Surface shine, often with lower traction | No fixed number applies; shine doesn't predict the value | Limit to dry areas or confirm the wet DCOF first |
That absorption ceiling is what separates a porcelain body from a standard ceramic one, and it matters on a floor that sees standing water. Density says nothing about grip, though, so the water figure and the traction figure get checked separately before any boxes are ordered.
Exposure changes the requirement. A bathroom floor outside the shower faces splashes, wet feet and the occasional overflow. A shower pan sits under running water and soap film daily, so a tile that just clears the benchmark for the room may be the wrong pick inside the wet zone. Finish carries the same weight as the body: the slate flooring pros and cons guide shows how a honed or cleft face changes grip and upkeep on a wet floor, and the matte versus polished choice on a hexagon follows the same logic.
Ask the maker this: Which test produced this wet value, on which finish, and for which floor use? A supplier who can answer all three in writing has done the work.
Subfloor, Drainage and Prep Before Setting Hexagons
Small hexagons expose every defect that a large format tile would hide. A 2-inch mosaic bridges nothing. It rocks over a high spot, telegraphs a dip, and shows lippage as a jagged line of edges that no grout haze will disguise, so the floor under the tile has to be right before any mortar is spread.
Flatness comes first. The ANSI A108 installation standard requires the substrate to sit flat enough to prevent lippage and rocking before setting begins. On a remodel, that usually means grinding high spots, filling low ones with a patching compound, or adding an underlayment panel rather than floating the pattern level with thinset.
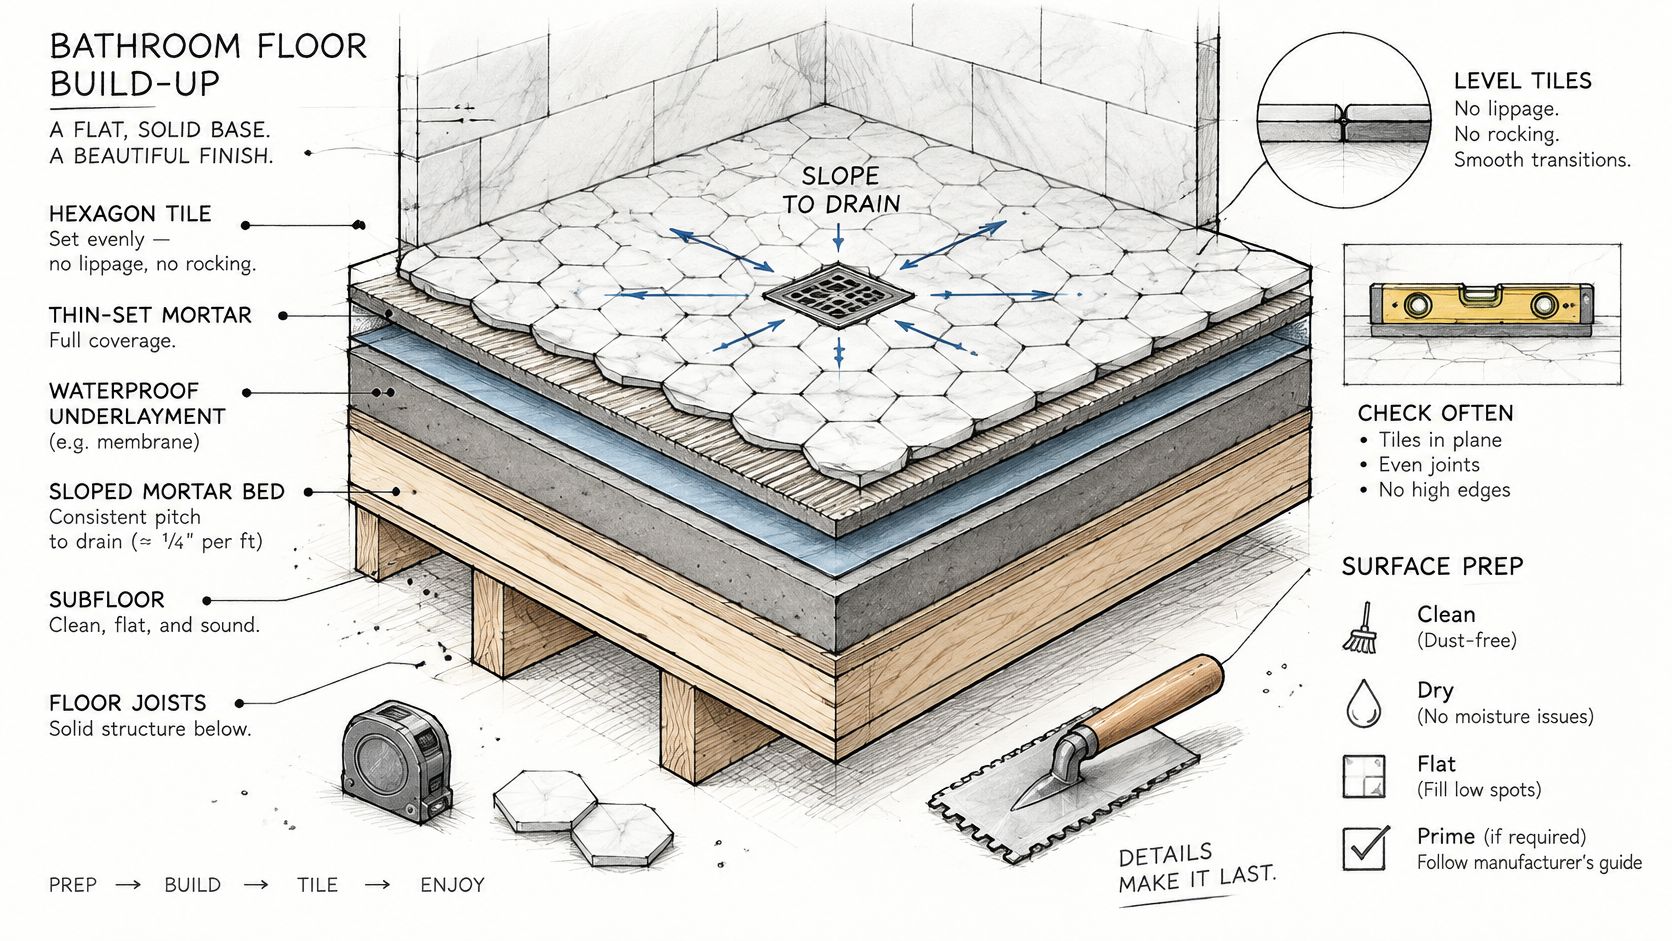
Read that cross-section as a checklist. Confirm the underlayment thickness matches what the mortar bed expects, and trace the waterproofing membrane from the pan out to where it should terminate on the main floor.
Drainage is the second gate. The tile installation standard limits bathroom-area slope to approximately 1/4 inch per foot toward the drain and calls for slip-resistant tile in wet rooms. On a standard floor, confirm the existing substrate and underlayment can reach that fall without a sudden step at the doorway. Where the floor meets a curbless shower, the slope, waterproofing, movement joints and tile layout all have to be settled before the order goes in, because correcting drain geometry afterward means lifting tile from a pattern that is fully interlocked.
A workable prep sequence for a hexagon floor looks like this:
- Flatness checked with a straightedge across the room in both directions, high spots addressed.
- Drain slope confirmed at the specified fall, with the transition at the door planned.
- Waterproofing detailed for the wet zone, including the seam where the shower meets the main floor.
- Layout approved during the dry-lay, with the perimeter cuts drawn on the wall.
Wet-area work also requires tile-setting and grout products rated for continuous moisture. A standard modified thinset chosen by habit can be wrong for a mesh-mounted mosaic that needs full support under every small piece, and that decision gets made before the tile is ordered.
Grout Joints and Layout Patterns for Hexagons
A hexagon floor is judged on its spacing discipline and on the waste its angled cuts add to the order. Wet traction comes from the tile's rated surface rather than its grout lines, so the joints' real job is holding the geometry true across the room. That discipline starts at the center.
The centering method is short and worth following exactly. Snap a center line down the length of the room and a second across its width, then place loose tiles along both lines in each direction to see how the pattern lands at the doorway, the vanity and the tub. Hold consistent joint spacing with spacers during the dry-lay so the test reflects the finished floor. If the loose course ends in a sliver on one side and a wide cut on the other, the line moves half a tile and the test repeats.
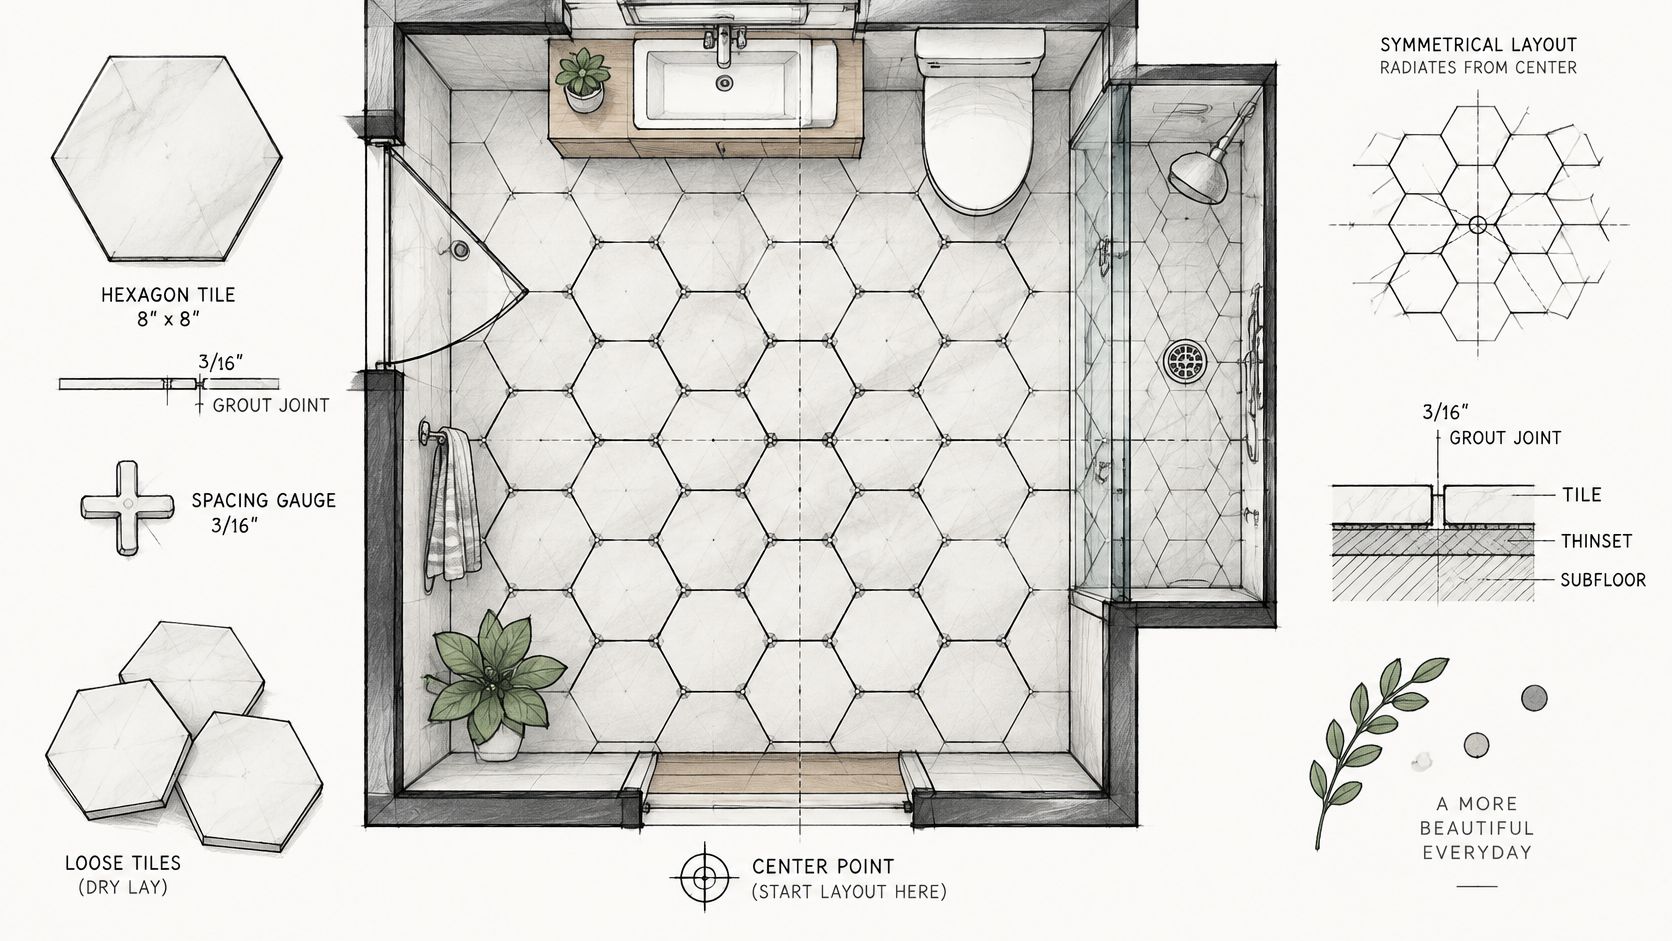
The tile maker's installation instructions set the joint width. Small mosaics usually want a narrow joint, and the mesh sheet sets the spacing on the field while the perimeter cuts need matching spacers. A joint that wanders by a sixteenth of an inch disappears in a 12-inch tile and becomes a visible wobble in a 2-inch hexagon.
Grout color is a design decision with a maintenance consequence. A grout matched to the tile softens the pattern into a calm surface and hides minor spacing variation. A contrasting grout turns the hexagon outline into the feature, and it also shows every joint that runs slightly wide, which is why high-contrast grout belongs on a floor where the spacing was checked in a dry-lay first. Gray and charcoal tones hold up better than bright white in a wet room, particularly near a shower.
Practical rule: Set the joint width from the spacer size the tile manufacturer names, then walk the dry-lay and check the joints before mixing anything.
Timing matters for the finish. Daltile's floor tile instructions call for waiting about 24 hours before grouting, subject to the adhesive manufacturer's directions, then spreading grout into the joints and cleaning the surface after roughly 15 to 20 minutes of initial set. Rushing the grout step on a small hexagon floor is expensive, because cleaning haze off hundreds of joints takes far longer than waiting did.
The doorway is the last check. Sketch the cut at the threshold and at the shower transition before buying, since those two edges are where an unbalanced layout is most obvious to anyone walking in. Angled cuts at every wall are also where the hexagon pattern adds material to the order, so the dry-lay should show which edges produce full cuts and which produce slivers that waste tile.
Count Boxes for a Hexagon Bathroom Floor
Count boxes from the measured net floor area, add a waste allowance set by the layout, round up to full boxes, and confirm the coverage figure on the product page. Hexagons need a bigger allowance than a straight plank layout because every wall generates a run of small angled cuts rather than one long rip.
Work the numbers in this order:
- Measure each rectangular section of the floor in feet and multiply length by width to get square feet. An L-shaped room becomes two rectangles, not one average.
- Add the sections together, then subtract only permanent openings that won't be tiled, such as a built-in vanity footprint.
- Set the waste allowance. Nexora Flooring advises 10 percent extra for a straight lay in a plain room, 15 percent for diagonal, herringbone or large format tile, and 20 percent for a room with many cuts and corners; when in doubt, order 15 percent more. A hexagon floor with a tub alcove, a door jamb and a shower curb sits in the higher band.
- Multiply the net area by the allowance to get the order area. A 60 sq ft floor with a 15 percent allowance needs 69 sq ft.
- Divide the order area by the coverage per box listed on the product page. Typical coverage varies with tile size and package, so the product page gives the exact figure for the product being bought.
- Round up to full boxes and keep the spare material from the same lot for future repairs.
The tile calculator runs that division for you once the net area and allowance are in hand. Waste follows the same logic as any other format, and the luxury vinyl plank vs laminate comparison is a useful reminder that box coverage, not piece count, controls how much gets ordered on any floor.
Batch consistency is the reason to buy the whole room at once. Tile is made in batches and shades drift between batches, so a second order six months later can arrive visibly different from the first, and on a floor covered in small hexagons that drift reads as a patch rather than a variation.
Caring for Hexagon Bathroom Floors
A hexagon floor carries more grout line than a square-tile floor of the same area, and those joints set the maintenance priorities. Grit packs into them, installation haze settles in them, and any crack in the grout is a path for water to reach the subfloor. The tile face rarely fails first.
Dry cleaning comes before every wet one. Sweep or vacuum first so loose grit never gets dragged across a glazed or polished face, where it works as an abrasive and dulls the finish over time. On small hexagons the joint lines trap particles faster than flat tile does, so pull the vacuum along the joints rather than only over the tile faces.
Buy the cleaner the care sheet names, and check the product's label against that list before it touches the floor. A product that is safe on a porcelain glaze can etch an unglazed or natural stone surface, and a marble hexagon floor follows a different routine from a matte porcelain one. The porcelain tiles vs marble tiles comparison covers how the two bodies age and what each one asks for in upkeep. For a concrete check, run a fingertip along the joints after the floor dries: a rough or cloudy joint still holds residue and needs another rinse with clean water rather than a stronger chemical.
- Sweep before mopping: Grit is the abrasive, so dry removal comes first every time.
- Lift haze out of the joints: Small hexagon joints hold a thin haze film, and a cloudy line that survives one mop usually clears with a nylon pad and clean water.
- Match the cleaner to the body: Read the tile and grout makers' care sheets and buy within those limits.
- Reseal joints on the maker's schedule: Hexagon floors carry more joint line per square foot, so a missed sealer date exposes more linear grout than it would on a large format floor.
- Inspect joints twice a year: Cracks and loose grout let water reach the subfloor, so repair them while they are small.
- Use flexible sealant at the tub and shower edge: Movement there cracks rigid grout, and a silicone joint absorbs it.
Where a polished hexagon sits in a walkway, keep a bath mat down; the mat supports the finish's tested wet traction limit rather than relying on grout line count for grip. File the care sheet, the tested wet DCOF figure and the carton label's batch number together, because a repair years later depends on matching all three.
Order Your Hexagon Tile Boxes With Confidence
Get the tested wet DCOF in writing before you order, and confirm it was produced by the ANSI A137.1 AcuTest method rather than an older static test. A number quoted without the method behind it leaves you guessing on the one rating a bathroom floor has to pass.
Order the full room in a single batch. Tile is produced in lots and shades drift between them, so a top-up carton bought later can sit visibly off against the first. Coverage is product-specific, which is why the sq ft per box is listed on each product page: Daltile Amity 3 in x 6 in Grey, for example, packs 50 pieces into 6.0 sq ft per box, and every hexagon format carries its own figure. The tile range shows the formats side by side, including the mosaic sheets that make small hexagons practical to install.
Rooms with many corners, a tub alcove, or a curbless shower edge are the ones worth a second look. Send those measurements through the estimate form and have the quantity checked against the layout before the order is placed. Hexagons generate more edge cuts than square formats, so awkward geometry pushes the waste figure up faster than a first pass at the dimensions suggests.
Nexora Flooring sells hexagon mosaic and mid-size tile by the box and ships across the U.S., with a box calculator that turns room measurements into cartons and an estimate form for rooms with awkward cuts. The tile collection lists more than 2,300 mosaic products alongside floor and wall formats, so the size band that fits a given room is easy to compare. Start with the exact coverage on each product page, then order the whole room in one batch through Nexora Flooring so the shade stays consistent.