News
Engineered Hardwood Tongue and Groove: How the Joint Works

Tongue and groove is a machined edge profile in which one board has a tongue and the next board has a matching groove, so the boards lock into one continuous floor. A homeowner standing in a half-empty living room with boxes stacked along one wall often discovers the key question at that point. The boards look ready to slide together, but the result depends on fit, installation method, perimeter space, and moisture. Treating the profile as one part of a movement system helps explain each decision before the first row goes down.
Table of Contents
- What Tongue and Groove Means for Engineered Boards
- How the Tongue and Groove Joint Locks Together
- Installation Methods That Change the Joint
- Expansion Gaps and Moisture to Confirm First
- How to Lay Tongue and Groove Boards Step by Step
- Common Problems and How to Fix Them
- Plan Your Boxes and Confirm Your Next Step
What Tongue and Groove Means for Engineered Boards
Each long edge and end of a board is machined so one side carries a protruding tongue and the opposite side carries a matching groove. Boards connect edge to edge into a single surface rather than sitting as separate planks. The comparison that helps most readers is a row of interlocking puzzle pieces. Each piece is guided by the shape of its neighbor, and the row stays aligned because the edges fit together.
An engineered board also carries a real wood wear layer over several cross-laid wood plies. That layered core helps limit movement across the width, while the tongue and groove handles alignment between boards. One does not replace the other. A buyer checking the Bedrosians Maison engineered hardwood board can see how a product page puts those details together, including board size and construction information needed before ordering.
Why Engineered Boards Became So Common
Engineered construction was developed for modern concrete-based homes where solid planks were harder to install. The format now dominates the category, since Floor Covering News research reports that engineered wood flooring accounted for approximately 75% of the U.S. wood flooring market in 2024, up from about 70% in 2023.
That scale explains why product pages list more than color. A careful buyer checks the edge profile, the permitted installation method, and the board thickness. Those three details shape the adhesive choice, the perimeter gap, and the subfloor preparation that follow.
How the Tongue and Groove Joint Locks Together
A single board explains the system. One edge is raised into a tongue, and the opposite edge is cut into a channel called the groove. When two boards meet, the tongue slides into the groove and holds both faces at the same height, the way a mortise joint lines up two pieces of trim on a cabinet.
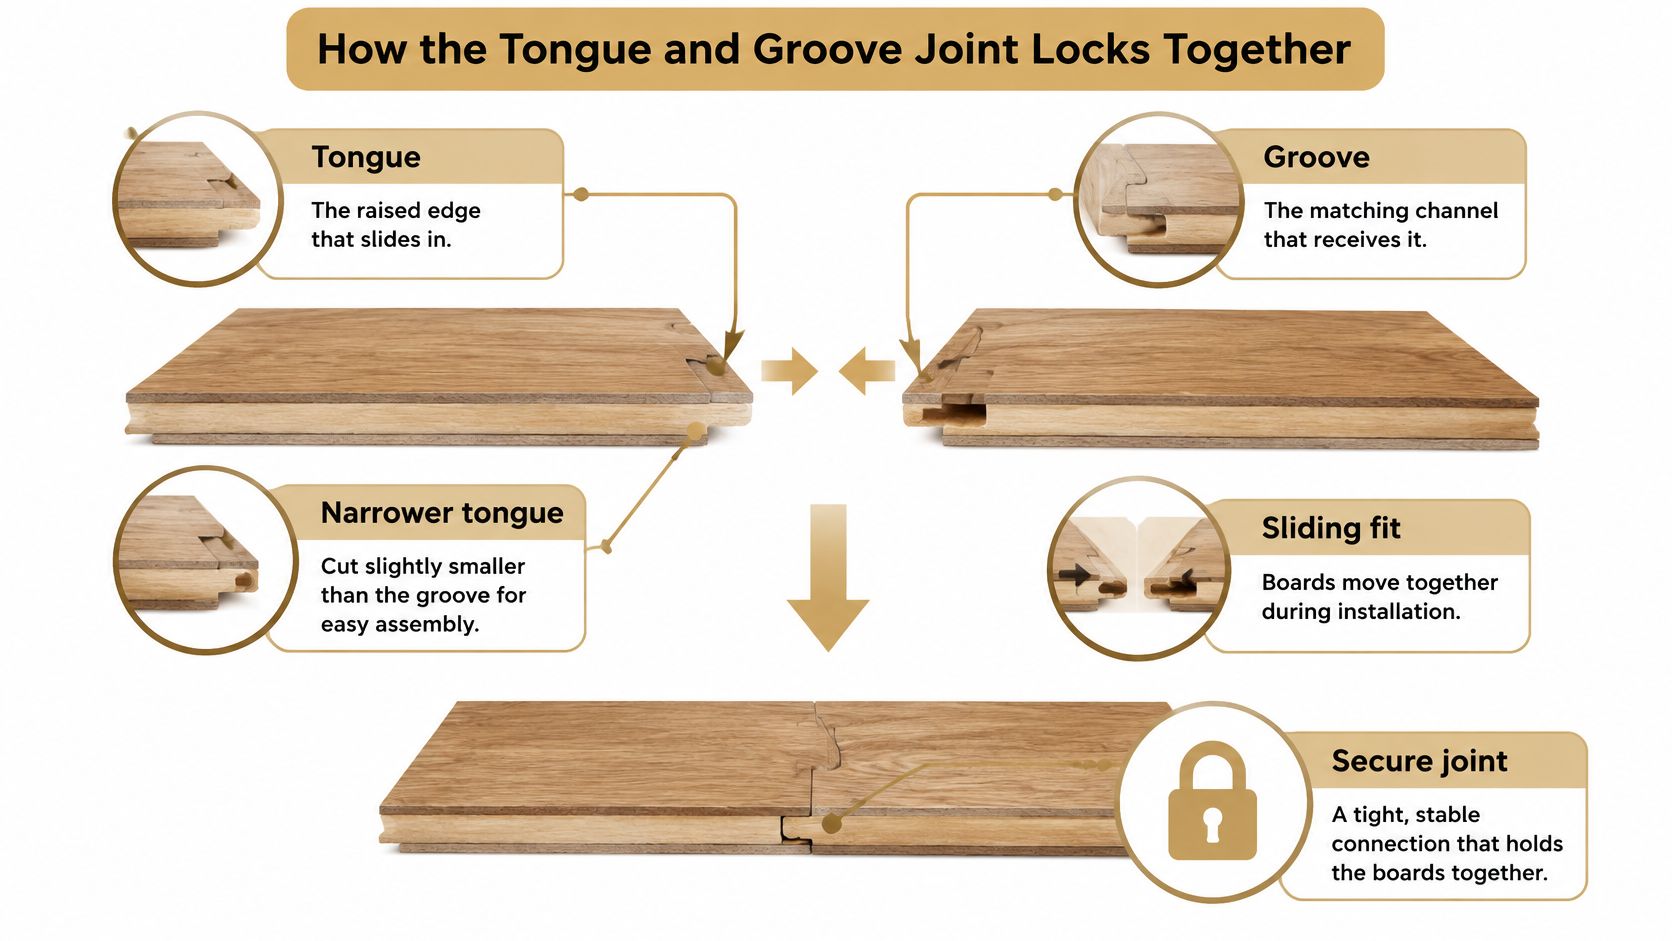
The tongue is cut slightly narrower than the groove so boards can join during installation. The NWFA Installation Guidelines reflect that snug fit principle: enough clearance to seat the board, little enough to keep it still. Excess clearance lets edges shift under load. A fit that is too tight can stress the profile and push installers toward forcing boards together.
The profile is one part of a larger movement system, so it helps to separate what the joint controls from what it leaves to the rest of the floor.
| What the joint controls | What falls outside its job |
|---|---|
| Side-by-side alignment of board faces | Sealing seams against moisture |
| Sharing foot traffic loads across a seam | Movement at the room perimeter |
| Limiting vertical displacement at edges | Conditions rising from below the floor |
What the Joint Does During Use
The connected edges align neighboring boards and share foot traffic loads. One board does not sink alone when pressure falls near its edge, because the tongue passes some of that load into the next board, the way linked fence panels steady each other in a row. The joint also limits vertical displacement, the small up-and-down movement that can make a seam feel uneven underfoot.
Fit check: A sound joint closes with light hand pressure or gentle tapping. A board that needs heavy hammer blows signals a fit, debris, or damage problem.
What the Joint Cannot Do
The profile gives no seal against moisture moving through seams or rising from below. A tight-looking joint and a watertight joint are two different things, and confusing them is where many moisture problems start. The joint also leaves the perimeter expansion space requirement untouched, since connected boards still shift as a group when humidity changes.
During installation, look for a closed seam, flush surfaces, and steady resistance without splintering. Loose movement, a raised edge, or a tongue that will not seat calls for inspection before more rows cover the problem.
Installation Methods That Change the Joint
The same engineered hardwood tongue and groove profile behaves differently in each installation system. Product instructions decide which system applies, so the profile alone never tells the full story. A floating floor relies on connected boards moving as one panel. A glue-down floor relies on adhesive bonding each board to the subfloor. A nail-down floor relies on fasteners and a subfloor that can hold them.
| Method | How the joint behaves | Fastening | Subfloor needs |
|---|---|---|---|
| Floating | Boards lock together and float over the subfloor | Manufacturer-specified adhesive in the groove and end joints | Clean, flat, dry; moisture at or below about 12 percent for wood |
| Glue-down | Boards are bonded to the subfloor | Flooring adhesive across the board | Clean, flat, dry; concrete needs moisture testing and a vapor membrane |
| Nail-down | Boards are held by fasteners through the tongue or face | Cleats or nails | Subfloor that accepts fasteners; check product instructions |
For floating floors, adhesive belongs continuously inside the groove, with end joints fully bonded. Floating engineered hardwood installation guidance ties incomplete bonding to joint opening, edge movement, and squeaks. In that system, the glued tongue and groove becomes the structure holding the panel together. In glue-down work, the groove still aligns boards, but adhesive under the board carries the main holding job. In nail-down work, the profile aligns boards while cleats or nails restrain them.
Flatness and Edge Cases
A common tolerance in published engineered flooring installation guides is 3/16 inch over 10 feet for subfloor flatness. A straightedge and feeler gauge make that check concrete instead of visual. High spots can rock a floating panel, and low spots can leave a glued board without full contact.
Long uninterrupted rooms need an expansion plan before ordering. Doorways and transitions need threshold placement checked against the permitted method. Radiant-heated slabs need product approval for that heat source and installation system. Repairs need a separate question answered early, since a glued or nailed board cannot always be lifted like a floating board. Confirming the permitted method on the product page before purchase prevents a mismatch between the board, the subfloor, and the room layout.
Expansion Gaps and Moisture to Confirm First
Wood responds to moisture and humidity, so a finished floor needs concealed space at fixed boundaries. The tongue and groove installation instructions state that the perimeter gap generally equals the thickness of the flooring. Spacers hold that gap while rows are installed, then baseboards or trim cover it.
| Plank thickness | Perimeter gap |
|---|---|
| 3/8 inch | 3/8 inch |
| 1/2 inch | 1/2 inch |
| Other thickness | Follow the product instructions |
The gap continues around walls and fixed vertical features such as cabinets, stairways, and pipes. Cutting a board tight against a pipe might look neat on installation day, but it removes movement space at the exact point where the floor cannot shift. Readers comparing moisture claims across floor types can also review the guide to waterproof flooring and laminate, while keeping engineered wood rules separate.
Moisture Readings Before Boards Open
The subfloor must be dry before installation, measured with a meter calibrated for that subfloor material. APA-based construction guidance says wood flooring should not be installed unless subfloor moisture falls within the range allowed by the flooring manufacturer, and crawl-space work calls for a minimum 6-mil polyethylene vapor retarder on the ground in a dry, well-drained space.
Before opening a box, an installer should have the gap width, spacer size, and recorded moisture readings ready to show.
Say a homeowner has a 12 ft by 15 ft room and a 1/2-inch board. The spacer gets cut or selected at 1/2 inch. Readings get recorded in several places, including near exterior walls and any area with a history of dampness. Installation starts only after those readings fall within the product range.
How to Lay Tongue and Groove Boards Step by Step
Clear steps matter because early rows set the geometry for the whole room. A crooked first row forces every later joint to absorb the error. A skipped end joint can stay hidden until foot traffic finds it.
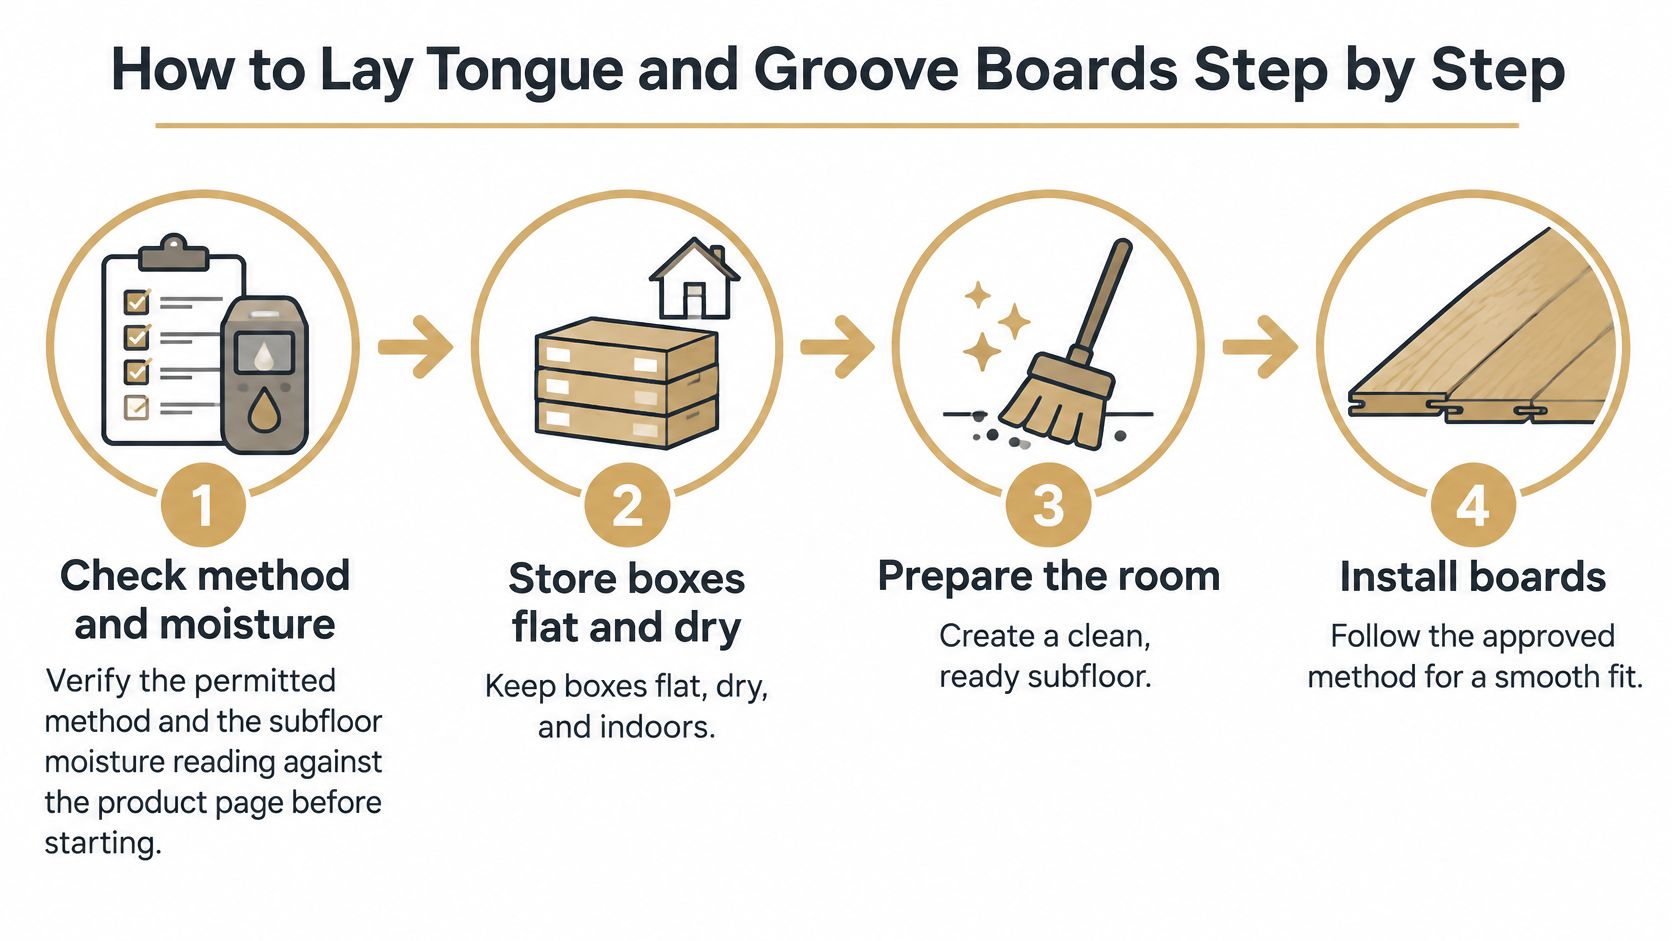
- Check method and moisture first. The permitted method and subfloor moisture reading get confirmed against the product page before starting, since the method sets adhesive and flatness rules. Work should pause when readings fall outside the allowed range.
- Store and acclimate the boxes. Boxes must be kept flat, dry and indoors, and wood needs time to settle in the room before being laid, as the installer specifies. The common slip is opening cold or damp boxes and laying boards the same hour.
- Start at the longest straight wall. Spacers go along that wall at the required perimeter gap width. A spacer cut to the wrong thickness creates a neat-looking room with the wrong movement space.
- Set the first row orientation. The tongue faces the room, and the groove faces the starting wall. That orientation lets the next row engage the exposed tongue without reversing the board pattern.
- Bond floating joints completely. Adhesive goes continuously inside the groove, with every end joint fully bonded. Skipping end joints saves minutes during layout and creates the seam most likely to open later.
- Stagger end joints and reject damaged boards. End joints shift from row to row so stress spreads across the floor instead of lining up in one seam. Any board with a cracked tongue, crushed groove, or chipped edge gets set aside.
- Tap boards home without forcing them. A tapping block spreads the blow and protects the profile. A board that will not close needs removal and inspection, because forcing it can break the tongue or lift the row.
- Finish the last row with the gap intact. Spacers stay in place until the final row is cut and fitted, with doorway and transition cuts planned before that point. Fitting for Nexora Flooring products is arranged through local fitters for buyers using an installer.
Signs the Finished Floor Is Sound
A sound floor shows even covered gaps at the walls and flush seams across rows. Foot traffic should not reveal lifted edges or squeaks at joints. Those checks take minutes with a straightedge, a flashlight held low across seams, and a slow walk along every row. Small concerns found before trim goes on are far easier to correct than the same concerns found after furniture returns.
Common Problems and How to Fix Them
Most joint complaints start with a symptom a homeowner can describe plainly. A seam opens. A step produces a squeak. One board refuses to close during installation. Each symptom points to a different first check, so treating them as the same defect wastes time.
| Symptom | Likely cause | Fix |
|---|---|---|
| Gaps open at end joints | End joint not fully bonded, or moisture shift | Check bonding and re-measure moisture before any repair |
| Squeaks underfoot | Incomplete adhesive in the groove or a loose subfloor | Re-secure the subfloor and check the bond at the affected joints |
| Board will not close | Forced fit, damaged tongue or groove, or swollen edges | Stop, remove the board and inspect it; do not force it |
| Chipped edge in the groove | Impact during handling or cutting | Replace the board and keep the joint intact |
Open end joints call for a bond check and fresh moisture readings before filler or replacement enters the plan. Squeaks need the subfloor and adhesive bond checked, since sound often travels away from the loose spot. Re-securing a small subfloor area and checking nearby bonds can fit into one day. Moisture stabilization takes longer because the room and subfloor need time to return to the product range.
Repair Without Breaking Neighboring Joints
A damaged board needs careful lifting so adjoining grooves stay intact. The installer protects surrounding edges, removes the failed piece in sections when needed, and fits the replacement without hammering against exposed tongues. Nexora Flooring recommends ordering from one batch so the shade matches, and keeping a spare box for repairs.
A board that will not close is a stop sign. Removal and inspection protect the tongue, the groove, and the rows already laid.
Small seasonal gaps that narrow again differ from open joints that stay open. A persistent opening, a raised edge, or repeated squeaking deserves measurement and inspection rather than cosmetic filler. That distinction keeps a normal movement response separate from a joint failure.
Plan Your Boxes and Confirm Your Next Step
Ordering works best after the room, method, and board choice agree with each other. A box count based only on room area misses cuts at walls, doorways, closets, and the final row. It also misses the practical value of keeping matching material for later repairs.
A Practical Ordering Sequence
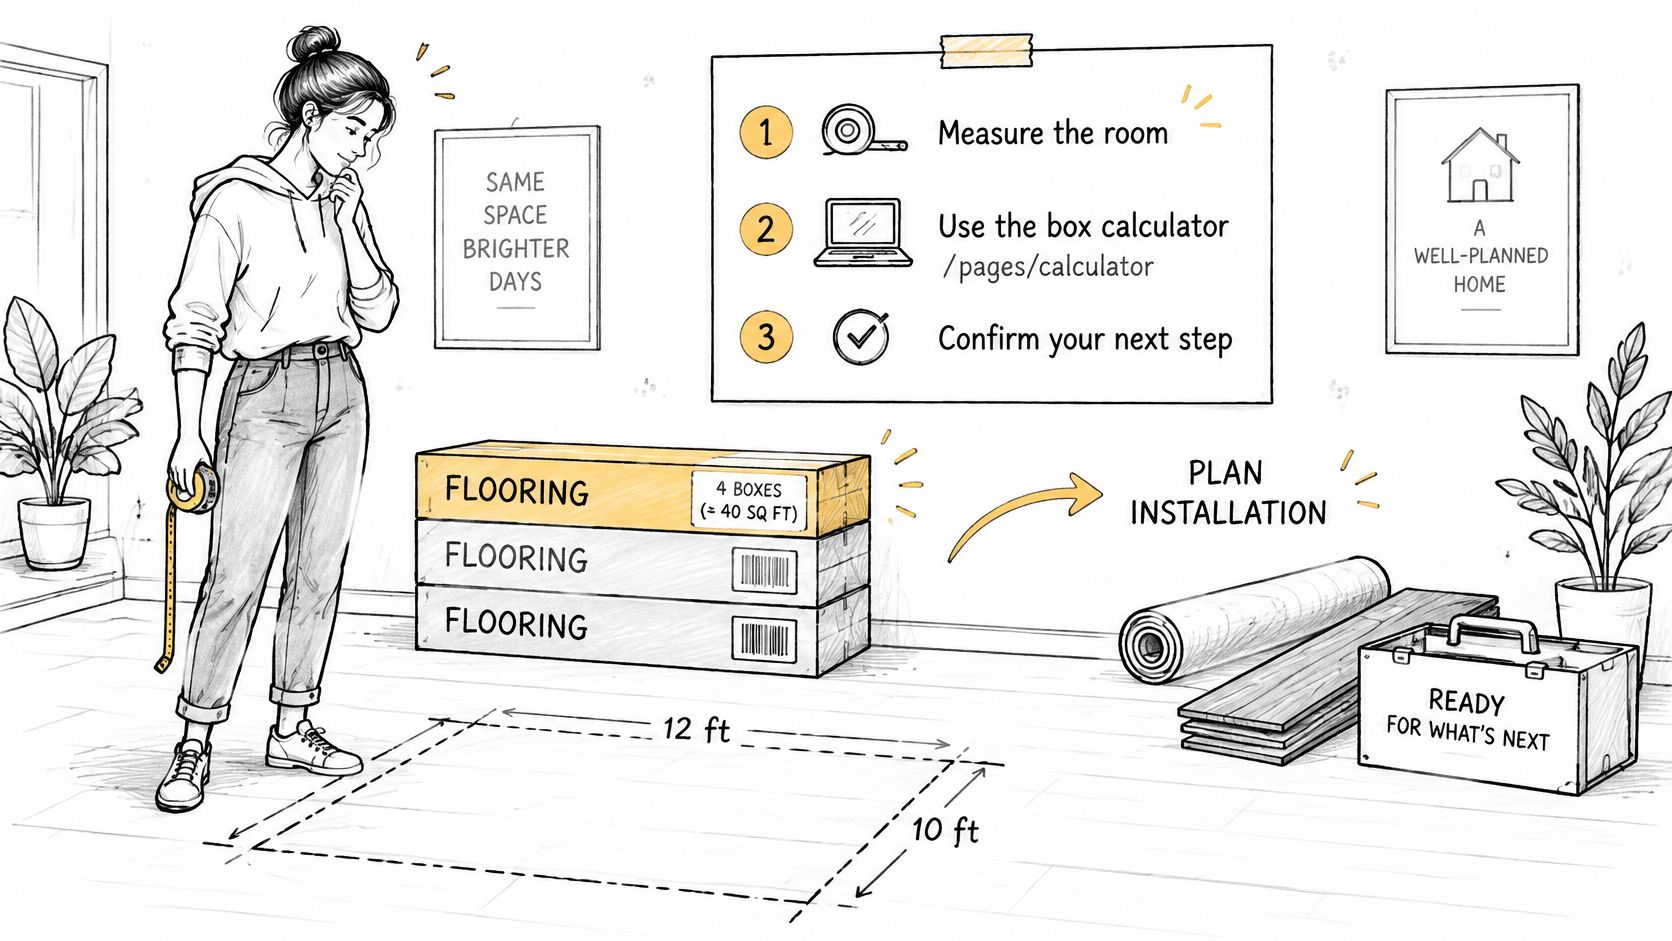
First, room length and width go into the box calculator to turn measurements into a box count with allowance for cuts, waste, and perimeter gaps. Angles, fireplaces, and closets should be measured as separate shapes instead of guessed into one rectangle.
Second, the chosen product page needs a careful check for edge profile and permitted installation method, plus the exact coverage per box. Any coverage-per-box number mentioned during early planning should be treated as typical only, with the product page checked for exact coverage. The hardwood range includes solid and engineered boards, so the construction type also needs confirmation before checkout. Once material is cut or laid, Nexora Flooring treats it as accepted and it cannot be returned, which makes that pre-order check especially important.
Third, board options can be compared, project cost questions can be reviewed through the guide to the cost of new hardwood floors, and the estimate form can be used to request an estimate. Method, gap width, and moisture plan should be settled before ordering because each one can change the board choice and final box count.
Homeowners and installers planning an engineered hardwood tongue and groove project can compare solid and engineered hardwood options sold by the box and shipped across the U.S. through Nexora Flooring. The next step is to measure the room, confirm the permitted method and exact box coverage on the product page, and request an estimate before ordering.